Showing posts with label TUTORIAL. Show all posts

Tuesday, February 25, 2014

DIY - Wine Cork Place Card Settings


So, I'm ready to get back to my blog after a year or so of wedding planning and stress....whew! Every girl dreams about having her big day and having this glorious day that's all about you.  Well that day does not come easy, you have to set your date, find your vendors, pick the "perfect" dress, pick out specific flowers your want, and so on and so on, I'm getting a headache thinking about it again.  Of course once you get all your beautiful pictures back from the photographer, all of those small details, that you stressed out about and didn't even notice during the dang day of the wedding, come into place and are commemorated forever in picture.


This is one of my favorite pictures of the details from the wedding, my husband, family and I made these Place Card Settings from hand within the last week of the wedding, talk about procrastinating.  I used a Place Card Template from Michaels and saved the corks from the bar I worked at so all I had to pay for was the Paper Templates which I used a Michaels coupon for, of course.  All and all these only cost me about $10.00 to make and I had close to 100 guests at my wedding.  


Supplies Needed:

  • Synthetic Wine Corks 
  • Box Cutter or Paring Knife
  • Place Card Templates
  • Butter Knife
Directions:

1.  Begin cutting slits into the middle of the Synthetic Wine Corks using a sharp knife like a paring knife, box cutters or something similar.  


     *I say to use synthetic wine corks because the regular corks will fall apart as you start to cut into them unless you pre-treat them first, like by boiling them in water for 10 minutes.  So by using the synthetic corks you can save time, they'll be easier to cut, no risk of falling apart when you put in the place card.

2.  Using Place Card Templates directions print out your guests names with table numbers on the bottom, using the fonts of your choice.

3.  Now this is the tricky part, put your Butter Knife into the slit you cut earlier to separate slit, then quickly place the place card inside.  This took some trial and error at first, but once you got into the groove they went in easier.  It is okay if at the beginning you ruin some of the place cards and are forced to reprint, it happens to the best of us.


This is definitely an easy way to put a little of your personality into your wedding, and doesn't cost much to make and you can recruit your friends, family or maybe favorite bartender to save corks for you to save money.  I hope you enjoyed this tutorial and check back soon for my Wine Cork Monogram Tutorial, which you can use your regular or synthetic wine corks for.


Friday, June 8, 2012

Flower Smashing Fabric


I saw an blog on BurdaStyle that was all about Eco-Dying Fabric.  They showed one about flower smashing to "stain" the fabric and I loved it!  This is my process of going through the Flower Smashing Technique. 

Supplies Needed:
  • Flowers/leaves of your choice (make sure they are fresh and still moist)
  • Fabric (100% cotton preferably a lighter color, white will work best)
  • Duct Tape
  • Shears
  • Hammer/Mallet
Directions:
  1. Prepping Fabric:  If you want to get vibrant colors from the flowers you're going to want to set/fix the fabric.  I did this by mixing 4 parts water to 1 part vinegar.  Bring to a boil in a large pot and put fabric in pot, let simmer for 1 hour.  It will smell so open some windows or you can try this website for other ways to Fix Fabric.  Let hang dry.
  2. Once your fabric has dried set on a flat surface (you want this to be a space you don't care about, or have it covered with plastic) and begin to spread out your flowers in the design you would like.
  3. Now begin putting duct tape strips over the flowers to hold them in place.
  4. Now with flowers facing down put plastic over fabric, you can cut up a trash bag, I didn't do this the first time and when I began to hammer the color of the flowers got onto the hammer and I begin spreading that and made it look spotty, so this will make it cleaner, but if you want a more abstract look you can choose not to  cover the fabric with plastic. Begin smashing your flowers with a hammer or mallet.  You will instantly be able to see the colors seeping through the fabric.
  5. Take tape off and remains of flowers.  Let dry for about an hour.
  6. Now to set the colors in the fabric with an iron press for about 5 seconds, the areas that were smashed.  Now your fabric is ready to use for your sewing projects.
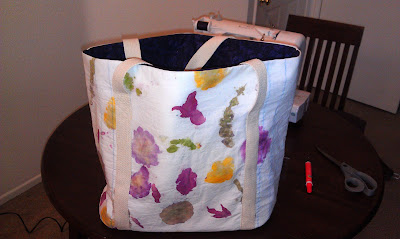
I made 3 insulated tote bags with a pattern I found here for Christmas gifts.


Follow Me on Pinterest


Wednesday, May 23, 2012

DIY - Convert Pants to Skinny Tutorial


So I have these pair of white pants that I loved the fit of when I first bought them, they were nice and long and made the butt look good ;-)  However once I washed them it was shrinks-ville.  I am about 5'7" and have run into this problem quite a few times after a few washes.  For bell bottoms or bootleg pants it especially becomes an awkward length.  However, for skinny pants right at the ankle is a perfect length to show off your cute shoes.  Here is a tutorial for converting those old pants into some cute upcycled skinny pants.  Hope you enjoy :-)

Supplies Needed:
  • Sewing Machine
  • Shears
  • Washable Fabric Pencil/Pen
  • Matching Thread
  • Old/Used Pants
  • Pair of Skinny Jeans/Pants that you like the fit of
Directions:
  1. First iron the Pants that you will be altering and the Skinny Jeans that you already like.
  2. With both pants inside out fold the pants in half like so, the back of the pants facing eachother.


3.  Place the Skinny Jeans on top of the pants you want to alter, making sure to align the crotch and seam that goes down.  You can already see where you will be sewing off.


4.  With a washable pencil/pen begin to draw a strait line down the pants you are altering.  Now it was a little difficult to keep the pants underneath flat, but try your best it doesn't have to be perfect, so long as the width is correct. While you are drawing the line press the Jeans down flat so your sure to get the whole width, it tends to bubble with a little air.


5. Now get to your sewing machine and sew up the line you just drew for your new seam.  If you would feel more comfortable you may pin right outside the line you just drew to make sure the pants stay put and don't move, but I don't think it's necessary.  I just tried to make sure there were no folds where I was sewing the new seam. I recommend using a zig zag or overlock stitch since they are skinny style they will most likely be under some stretching pressure. I started at the top so I could start with the old seam and then worked my way down.  By starting where the old seam is your preventing any air bubbles from forming and making your pants look amature.  This will make your seam look clean.  Since you are starting at top and going down, the hem may end up uneven but we can fix this at step 11.

6. After sewing up the seam, I went ahead and turned them right side out and tried it on to make sure I liked the new fit.

7. Now that I know I like the new width I took them off and went back to inside out and folded them back to the way we started and lined up the crotch seam to the other leg.  This way both of the legs are the same width.  Rather than if I used the Skinny Jeans again I could end up drawing a new width for the other leg.  Draw up new line, I did trim the leg that I already sewed so it would be easier and then lifted up access fabric to align the seam and not the extra fabric too.

8. Go ahead and sew up the other leg using the zig zag/overlock stitch again.

9.  Try on the pants again to make sure both legs look even, before we cut off the excess fabric.  Then there's no going back...

10. Now trim off your excess fabric about 1/4" away from the new seam. Add a finishing seam to the edge, I just went ahead and did another zig zag stitch along the edge.  This is important because it will take care of fraying fabric and like I said earlier since they are Skinny we will be putting some pressure on the seam a lot so just in case anything rips or tears you got a back up...there will be no bare leg flashing :)


11. Now this last step is optional, but I think it gave off a better finished look.  And since your aligning the crotch seam you may end up making the bottom hem uneven.  So fold over the hem halfway up, press, repeat.  Sew up new hem, I used just a strait stitch for bottom, an overlock double needle stitch would be prime though just seemed like too much work..hah.

Now your all finished and have a cute and stylish new pair of pants :-)


Follow Me on Pinterest


Thursday, March 8, 2012

Long Sleeve Shirt Into Mini Skirt


Supplies Needed:


* Old long sleeve shirt (short sleeve could work, but I used the sleeves for the waist band so you  would have to improvise).  It needs to be a knit fabric though so it can fit over our womanly curves :)
* Thread
* Rotary Cutter or Shears
* Clear ruler


Directions:


1.  Cut off the sleeves.  Don't mind the deoderant streaks, I was trying to see if this shirt would even fit over my hips and got deoderant everywhere, I can wash it out later :)


2. Cut strait line at the armpits, this is where the clear ruler came in handy.


3. Next measure the width of the top of your skirt.  Mine ended up being 18.5", this will help determine how long you need to make the waistband.  So I used the sleeves to create a waistband, but if you have a short sleeve shirt you want to use you could always use any excess fabric you have laying around or an elastic band (get creative with it).


4. So I added a 1/2" to my 18.5", so I would have a little room for the seams making the front of the waistband 19".  Line up the sleeve to the length you desire and cut a strait line.


5. Next I got the clear ruler and saw where I could cut off the excess sleeve and get a strait line.  Make sure the fold from the sleeve is on top.


6. Now pin your cut waist band to the other sleeve you have.  Cut around so that they are both the same size.


7.  Now pin both ends together so create your waistband and sew together.  I used a zig zag stitch, just make sure you use a stitch that will stretch out for the knit fabrics.


8.  Now with the skirt inside out, pin the waistband to the inside (so the right sides will be facing). Make sure you match up the seams on the sides. Then sew.


9.  Press seam.  Now we have a cute little mini skirt!


Follow Me on Pinterest

Tuesday, March 6, 2012

Button Up Blouse to Halter Top


Supplies Needed:


* Sewing Machine
* Used Blouse
* Shears
* Matching Thread
* Washable fabric pen or pencil


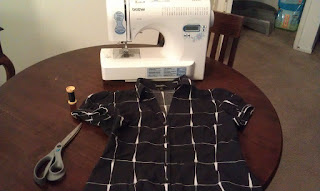
So I had a blouse that fit great except for the arms were really tight and uncomfortable.  Since the fit was good everywhere else I decided to take off the arms and turn it into a halter top.  You could always use a shirt you already have, or pick up something from a thrift store to alter.  Here is the before:


Not bad just uncomfortable


1.  First thing I did was put on the shirt and with a washable fabric pencil draw lines where I wanted to cut out the sleeves.


2.  Cut the marking you just made and strait across the back.


3.  Fold over the raw edges about a 1/4" and press.  Fold over again to get rid of the raw edges and press. Sew.


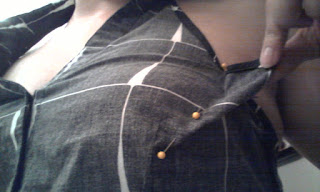
4.  Then try on the garment.  For me it did end up being larger around the armpits and bust.  So I simply put it on inside out and pinned out some darts along the bust to give it a nice fit.  Then tried it on again to see how the fit was.  You may need to play around with this for some time so that you get just the right fit.  Since the blouse already had some darts along the bust I tried to form the new darts into the old one so it looked nice and smooth.


5.  Now that you have your darts pinned in and you know that it is going to give you a nice fit sew the darts.  Be sure to press flat afterwards.  Now you have a whole new look :)


Follow Me on Pinterest