Monday, May 21, 2012

Skinny Pineapple Mojito


This is one of my new favorite drinks, and I don't even like rums.  I've been trying to create drinks that incorporate fresh fruit for the Spring/Summer season; and this is no exception.  With fresh pineapple, mint and limes you get amazing natural flavors without all the calories that normally come with a Mojito.  Cheers to summer!


Tools Needed:
  • Martini Shaker
  • Muddler
Ingredients
  • 6 Pineapple Cubes
  • 10 Mint Leaves, mint sprig for garnish (optional)
  • 3 Lime Wedges
  • .5 oz Pineapple Juice
  • 2 oz. Bacardi Limon
  • Splash of Soda Water
Directions


  1. Chop up your pineapple cubes, they should be pretty small about 1cm each.
  2. Put the pineapple cubes, mint leaves and lime wedges into bottom of pint glass.
  3. Pour in your pineapple juice, muddle vigorously to get the juices out of pineapples and limes.
  4. Scoop in ice to fill up glass.
  5. Add in the Bacardi Limon and shake in martini shaker for about 10 seconds.
  6. Pour back into your original glass and top with soda water.
  7. Add mint sprig to top of glass for garnish.  Enjoy :)
 You can see the chunks of pineapple floating in the drink and they as you drink you will get those yummy chunks of pineapple coming up and they are absolutely fantastic...mMmmM

Follow Me on Pinterest


Monday, May 14, 2012

Raspberry Mochatini


This is my new favorite drink!  I was inspired by a recipe I saw for a martini that had Absolut Raspberry and Baileys Irish Cream; and a martini we make at my work, the Espresso Martini.  Plus I have an obsession with chocolate :)  It tastes similar to a mocha with the espresso and chocolate, but then the raspberry flavors take away from being overly sweet and with the fresh raspberries shaken into the drink you taste the seeds which I love to get that texture at the end of the drink.  Hope you enjoy as well.


Ingredients:
  • 1.5 oz Absolut Raspberry
  • .75 oz Baileys Irish Cream
  • .75 oz Godiva Chocolate Liqueur
  • dash of cream
  • 1 shot espresso
  • 2-3 fresh raspberries
  • Chocolate Syrup
Directions


  1. Get your espresso shot ready.
  2. Fill pint glass 3/4 full of ice.
  3. Toss in ingredients and shake vigorously for 10 seconds, getting the raspberries nice and mashed up.
  4. Swill chocolate syrup on your martini glass and strain drink into glass
  5. Enjoy :)

Follow Me on Pinterest


Thursday, March 8, 2012

Long Sleeve Shirt Into Mini Skirt


Supplies Needed:


* Old long sleeve shirt (short sleeve could work, but I used the sleeves for the waist band so you  would have to improvise).  It needs to be a knit fabric though so it can fit over our womanly curves :)
* Thread
* Rotary Cutter or Shears
* Clear ruler


Directions:


1.  Cut off the sleeves.  Don't mind the deoderant streaks, I was trying to see if this shirt would even fit over my hips and got deoderant everywhere, I can wash it out later :)


2. Cut strait line at the armpits, this is where the clear ruler came in handy.


3. Next measure the width of the top of your skirt.  Mine ended up being 18.5", this will help determine how long you need to make the waistband.  So I used the sleeves to create a waistband, but if you have a short sleeve shirt you want to use you could always use any excess fabric you have laying around or an elastic band (get creative with it).


4. So I added a 1/2" to my 18.5", so I would have a little room for the seams making the front of the waistband 19".  Line up the sleeve to the length you desire and cut a strait line.


5. Next I got the clear ruler and saw where I could cut off the excess sleeve and get a strait line.  Make sure the fold from the sleeve is on top.


6. Now pin your cut waist band to the other sleeve you have.  Cut around so that they are both the same size.


7.  Now pin both ends together so create your waistband and sew together.  I used a zig zag stitch, just make sure you use a stitch that will stretch out for the knit fabrics.


8.  Now with the skirt inside out, pin the waistband to the inside (so the right sides will be facing). Make sure you match up the seams on the sides. Then sew.


9.  Press seam.  Now we have a cute little mini skirt!


Follow Me on Pinterest

Tuesday, March 6, 2012

Button Up Blouse to Halter Top


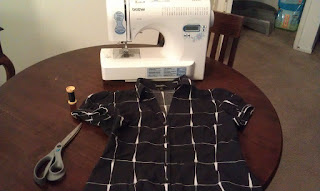
Supplies Needed:


* Sewing Machine
* Used Blouse
* Shears
* Matching Thread
* Washable fabric pen or pencil


So I had a blouse that fit great except for the arms were really tight and uncomfortable.  Since the fit was good everywhere else I decided to take off the arms and turn it into a halter top.  You could always use a shirt you already have, or pick up something from a thrift store to alter.  Here is the before:


Not bad just uncomfortable


1.  First thing I did was put on the shirt and with a washable fabric pencil draw lines where I wanted to cut out the sleeves.


2.  Cut the marking you just made and strait across the back.


3.  Fold over the raw edges about a 1/4" and press.  Fold over again to get rid of the raw edges and press. Sew.


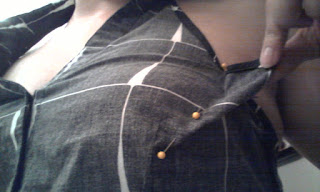
4.  Then try on the garment.  For me it did end up being larger around the armpits and bust.  So I simply put it on inside out and pinned out some darts along the bust to give it a nice fit.  Then tried it on again to see how the fit was.  You may need to play around with this for some time so that you get just the right fit.  Since the blouse already had some darts along the bust I tried to form the new darts into the old one so it looked nice and smooth.


5.  Now that you have your darts pinned in and you know that it is going to give you a nice fit sew the darts.  Be sure to press flat afterwards.  Now you have a whole new look :)


Follow Me on Pinterest

Friday, March 2, 2012

Welcome to In-Perfection!! I've been thinking about starting a blog for a while so I am very much so looking forward to sharing some creativity!  Hopefully I can start a project this weekend and we can get started.  See you soon :)